Showing posts with label Dip Dyed Ombre. Show all posts

Monday, March 12, 2018

Lil' Inker Designs March Release Day #2


It's day two of the Lil' Inker Designs New Release Hop and I get to share even more fun goodies with you today!  I'm sure you've already been eyeing all the awesome new items, lucky for you, you can get it all right now in the Lil' Inker Store.  Hopefully, you checked out all of Amy's amazing creations before hopping here.  If not of it you get lost along the hop you can always find your spot by going to the Lil' Inker Blog.  For now, I'm ready to show off some more fun stuff!

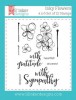
Today I decided to show you what I created with the So Very Kind Greeting Die, Bouquet of Roses Stamps, and Bouquet of Roses Dies.


I wanted to try something a little different with the So Very Kind Greeting Die.  I just love this series of dies and wanted to make sure I did something extra special with this one so I created a background with it by cutting it one after another from a black piece of cardstock.  I layered this onto white to really make it pop.  Next, I stamped and colored the Bouquet of Roses Stamps before cutting it out with the Bouquet of Roses Dies.  I added my bouquet to the card front at an angle so that you can read the sentiment and then decided it needed a little extra pop of color so I threw in a bit of red dotted paper.  I love how bold it turned out!  What do you think?  Here's another peek:


My next card uses the thanks die that is part of the Bouquet of Roses Dies as well as the So Prickly Cactus Die Set.


I've been waiting for a super special set to use this really cool glittered gold puffy background that I've been hording.  Well, the So Prickly Cactus Die Set seemed like the perfect fit.  I got to work cutting the pots from various black & white papers and the cactus out of greens including the green piece from the Dip Dyed Ombre Paper.  Super cute!  I added some pops of pink and puffy black heart and finished it all off with a sentiment I cut using the Bouquet of Roses Dies. Here's a closer look:


Don't want to forget about our giveaway!


You'll want to leave comments along the way because Laura is giving away the ENTIRE NEW RELEASE to a lucky commenter during the new release hop.  The winner could be you.  I hope you are enjoying our new release!  We love sharing these awesome products with you!  Be sure to keep hopping, here's the list:

Chrissy Larson <---Yup, that's me!!!

Don't forget you can check out the new release right now in the Lil' Inker Store and you can get all the goodies I used today.  Here's what I used:

https://www.lilinkerdesigns.com/so-very-kind-greeting-die/#_a_clarson     https://www.lilinkerdesigns.com/bouquet-of-roses-stamps/#_a_clarson

https://www.lilinkerdesigns.com/so-prickly-cactus-dies/#_a_clarson     https://www.lilinkerdesigns.com/so-very-kind-greeting-die/#_a_clarson

http://www.lilinkerdesigns.com/dip-dyed-ombre-paper-pad/#_a_clarson

Friday, January 27, 2017

With Sympathy

Good morning!  I see some sun this morning and it is totally making this a great Friday already.  The snow just sparkles so beautifully in the sun and it has been SO gloomy lately.  Luckily, it hasn't been as cold as it normally is this time of year.  It's always nice when it snows and is warm enough to actually enjoy it.  I hope you are all enjoying your morning no matter what the weather is like.

Today, I decided to share two cards that I made using the Inky Flower Stamp Set and With Sympathy Word Die.  Layered on the Dip Dyed Ombre Paper, it made a perfect sympathy card.


I made a bunch of these all at once because I struggle with sympathy cards, especially when I actually need one.  When I come up with a nice design, I make several to ensure I have them on hand.  I hate that I need a stash of sympathy cards but it is a fact of life.  To create this cards, I chose several colors of Lil' Inker Designs Dip Dyed Ombre Paper and cut them for my card fronts.  Then I stamped along the edges using Inky Flower in colors the either complimented the color of the paper or created a monochromatic look.  I didn't want either product to outshine the other or be too flashy.  I loved the combos I came up with as they looked simple and classy.  I then cut my sentiment using the With Sympathy Word Die cut from in papers that matched the ink I used on the card.  I toyed with the placement of my sentiment for awhile before deciding to use a little vellum to help it really stand out but not break the card up too much.  Here is a look at each card individually.


I also played around with the orientation of the vellum.  I really like them both and I hope you do too!  You'll have to check out these awesome products but you should also check out the Lil' Inker Designs blog!  Today is Flashback Friday and the cards Jessica shared are AMAZING.  Also the products she used are on sale:  Perky Posies Die Set, Sending You Stamps, and the Spring Flowers Die Set.  Make sure to check it out!


Here are the products I used today:


Sunday, September 11, 2016

Lil' Inker Designs September Release Day #1


Hi, you guys!  It's day one of the Lil' Inker Designs New Release Blog Hop and I'm super excited to share all the new products with you!  I think you are really going to enjoy this release and all the new inspiration from our team.  It's packed with fun, as always and, lucky for you, all the new products are available right now at the Lil' Inker Store!  We have an amazing blog hop for you today so, hopefully, you are coming from Amy's blog and if not, you won't want to miss her amazing creations or anyone's for that matter!  So make sure you didn't miss anyone and start at the Lil' Inker Blog.  Now for the fun!

My first project for today features the coolest undead characters ever!  I used the Zombie Kids Stamp Set, Zombie Kids Die Set, Wonky Rectangles Die Set, and the previously released Cover Up Die:  Stitched Woodgrain, Stitched Mats: Long & Skinny Rectangles, and Dip Dyed Ombre Paper Pad.


When I saw these cool zombies, I knew I needed to have them busting through a barricade like in The Walking Dead.  I think Rick and the crew would think twice about taking out these cute zombies though.  I stamped my Zombie Kids and cut the out using the Zombie Kids Die Set.  I colored them using copics and I made sure they had a bit of a green tint to their skin.  We can't have fresh looking zombies!  Next, I used Cover Up Die:  Stitched Woodgrain and Stitched Mats: Long & Skinny Rectangles to create my wooden barricade on some green striped paper.  Once I had them all layered, along with my zombies, to the green, I ran the whole thing through my die cutter using the Wonky Rectangles Die Set.  Layering everything before cutting the final shape ensured that the stitching on the Wonky Rectangle was on all my wood planks also making everything more cohesive.  Layered on a purple ombre paper from the Dip Dyed Ombre Paper Pad was just perfect.  A bit of bling and enamel finished it all off just right.


Next up, I had more fun with the Zombie Kids Stamp Set and Zombie Kids Die Set.  This time I couldn't wait to build a scene with the new Tombstone Peek-A-Boo Die, Dual Dotted Border Builder Dies, and Stitched Mats: Rounded Rectangles.


I just couldn't stop with one zombie card when this set is SO awesome!  My next walker is wandering through a spooky cemetery.  I have had this cute Halloween paper for far too long.  I admit that I've been hoarding it.  It had to be used for this release though.  It was too perfect.  Now, the Tombstone Peek-A-Boo Die is totally cool and can be used SO many ways!  It has one side that does not cut so you can totally use it to make little peek-a-boo windows in your cards!  I wanted a simple tombstone for this card so I cut that side out myself on my trimmer but you can bet there will be some window cards coming from me soon!  I layered my Tombstone Peek-A-Boo Die with some patterned hills made using the Dual Dotted Border Builder Dies.  I love that I can cut RIP or BEWARE or both on my tombstone all with one run through of the die cutter!  I layered my Zombie Kid between the layers and then finished my card front by rounding the corners using Stitched Mats: Rounded Rectangles.  I totally love the sentiments found in the Zombie Kids Stamp Set and this one just makes me happy!  Here's another look:


I hope you enjoyed my creations and will join the rest of the team on the hop.  You'll want to leave comments along the way because Laura gives out a $15 Lil' Inker Designs store credit to a lucky commenter each day of the hop.  It could be you.  I'm sure I'll see you on the hop and tomorrow for another fun day of release projects.  See you then!

 Chrissy Larson <---Yup, that's me!!!

Don't forget you can check out the new release right now in the Lil' Inker Store and you can get all the goodies I used today.  Here's what I used:

https://www.lilinkerdesigns.com/zombie-kids-stamps/#_a_clarson

https://www.lilinkerdesigns.com/zombie-kids-die-set/#_a_clarson

https://www.lilinkerdesigns.com/wonky-rectangles-dies/#_a_clarson


https://www.lilinkerdesigns.com/stitched-mats-long-skinny-rectangles/#_a_clarson

https://www.lilinkerdesigns.com/dip-dyed-ombr-e-paper-pad/#_a_clarson 

https://www.lilinkerdesigns.com/tombstone-peek-a-boo-die/#_a_clarson

https://www.lilinkerdesigns.com/dual-dotted-border-builder-dies/#_a_clarson

http://www.lilinkerdesigns.com/stitched-mats-rounded-rectangles/#_a_clarson


Tuesday, July 26, 2016

Lil' Inker Designs July Release Day 3!


Well, it's the last day of our new release hop at Lil' Inker Designs and I'm super excited to show off these last couple products.  Hopefully, you started out at the the Lil' Inker Blog so you don't miss a stop on the hop and have come here from the amazing Jen's blog.  If you are feeling a little lost, make sure you hop back to the Lil' Inker Blog to get back on the trail of fun.  You can also check out the Lil' Inker Store where all of the new release goodies, and a whole lot more, are ready and waiting for you to put in your cart!

My final card for this release uses the new Alphabet Gems Dies along with the previously released Alphabet Gems Stamps, Cover Up Die: Faceted, and Awesome Blossoms Stamps.


I was really in the mood to play with some texture on this card.  I started with some wood veneer paper as my card front and cut it off at an angel before filling in that space with vellum.  To the vellum, I added a portion of the Cover Up Die: Faceted cut from the Dip Dyed Ombre Paper Pad.  This gave my card the stability it needed to stand up while still having the translucent quality of the vellum.  I stamped a portion of a sentiment from Awesome Blossoms Stamps on a strip of vellum and added that with some black glitter tape and gold foil tape to the card front.  Next, I stamped and cut Alphabet Gems Stamps and Alphabet Gems Dies from some wood veneer paper and inked the bottoms with a coordinating pink before completing my sentiment with them.  A little bling, and my card was complete.  Here's a closer look at the inking:   


I hope you enjoyed my creations and will join the rest of the team on the hop.  You'll want to leave comments along the way because Laura gives out a $15 Lil' Inker Designs store credit to a lucky commenter each day of the hop.  It could be you.  I hope you enjoyed out new release!  We love sharing these awesome products with you!  Be sure to keep hopping, here's the list:

Chrissy Larson <---Yup, that's me!!!

Don't forget you can check out the new release right now in the Lil' Inker Store! Here's what I used for my projects today:

https://www.lilinkerdesigns.com/alphabet-gems-dies/#_a_clarson
 
https://www.lilinkerdesigns.com/alphabet-gems-stamps/#_a_clarson

https://www.lilinkerdesigns.com/cover-up-die-faceted/#_a_clarson

https://www.lilinkerdesigns.com/awesome-blossoms-stamps/#_a_clarson


https://www.lilinkerdesigns.com/dip-dyed-ombr-e-paper-pad/#_a_clarson