Showing posts with label July Release. Show all posts

Monday, July 24, 2017

Sand Dollars - Frantic Stamper

As a kid, one of my favorite memories was going to the beach after a big storm and collecting sand dollars and star fish.  I remember trying to save the starfish with my brother by putting them in a Frisbee and taking them back out into the water.  Some were SO big they would wrap around the Frisbee.   So when I saw the Sand Dollar & Jellyfish Die (FRA-DIE-10243), I couldn't help buy smile.  If you haven't yet, you must check out the new Frantic Stamper July Release products.  I created a card with a little more elegance than my other playful creations this month.  Check it out:


I started with this fun ombre paper as a launching point.  It sort of reminded me of the sand as the waves rolls back into the ocean and it starts to dry.  I chose a coordinating peachy card stock to cut my sand dollar from using the Sand Dollar & Jellyfish Die (FRA-DIE-10243).  I inked the edges with a copic marker in a slightly darker peach to give them dimension.  Next, I layered my sand dollars on my card front and stamped a sentiment.  I took some coordinating copics and created the speckles around and on the sand dollars before adding some sequins to the mix.  The dots made me think of the sand and the sequins the little shines of water and other shells.  Here's a closer look:


Thanks so much for checking out my card and I can't wait to share more of what I created with this awesome July release from Frantic Stamper.  See you soon!

Monday, July 17, 2017

Bobbing Along With Frantic Stamper

Bobbing along, bobbing along on the bottom of the beautiful briny sea!  He he he, I sang that all weekend at the water park with the boys.  They may not have enjoyed it as much as I did.  ;)  I know for sure you will enjoy this new and fun summer release, however.  If you haven't yet, you must check out the new Frantic Stamper July Release products.  I've been having a blast creating and this one is one of my favorites!  Check it out:


I'm slightly addicted to the Rolling Wave Card Panel Die (FRA-DIE-10257) so, I had to use it again on this card.  I found this fun splashy looking background paper in a 6x6 paper pack on my shelf.  If you don't know me already, I'm addicted to pattern paper.  I loved how the tealish pattern looked with the yellow so, I cut that using the Rolling Wave Card Panel Die.  I wanted to make sure the background showed through but didn't make the card too busy so I added a layer of vellum behind my wave panel.  I created my sentiment with chipboard letters as well as letter block stickers.  I added my little sub created using the Submarine Die (FRA-DIE-10249) cut from some other fun papers from the same watery pack and vellum windows.  I placed my sub and then added a few clear sequins to finish off the card.  Here's a closer look:


Thanks so much for checking out my card and I can't wait to share more of what I created with this awesome July release from Frantic Stamper.  See you soon!

Monday, July 10, 2017

Something's Fishy - Frantic Stamper

Is it just me or is this new release cooler than a dip in the ocean?  If you haven't yet, you must check out the new Frantic Stamper July Release products.  I've been having a blast creating and this one is one of my favorites!  Check it out:


I wanted to use the new Rolling Wave Card Panel Die (FRA-DIE-10257) in a unique way so I cut it in vellum and used the negative pieces layered behind the Coral and Seaweed Oval (FRA-DIE-10234 ) which I cut out from this soft blue patterned paper.  I layered the two on some green cardstock and trimmed around the edge to give just a touch of green to the card before layering it on this yellow striped cardbase.  Next, I cut some of the adorable fish using the Three Fish Die (FRA-DIE-10247) and some orange paper.  I layered them in the seaweed and coral using foam tape and gave them some fishy google eyes.  Next, I created a sentiment using some cardstock sentiments layered with a fun banner and some hearts.  I loved how this area tied together the green and yellow papers I chose.  Finally, I finished it all off with some sequin bubbles.  Here's a closer look:


Thanks so much for checking out my card and I can't wait to share more of what I created with this awesome July release from Frantic Stamper.  See you soon!

Thursday, July 23, 2015

Lil' Inker Designs July Release Day #3


Well, it's the last day of our new release hop at Lil' Inker Designs and I'm super excited to show off these last couple products but before we get into all that I have to make sure you are coming here after visiting Sarah.  If not, head on over to the the Lil' Inker Blog so you don't miss a a stop on the hop.  You won't want to miss a thing!  While you are visiting the Lil' Inker Blog, make sure you go check out the Lil' Inker Store where all of the July release goodies, and a whole lot more, are ready and waiting for you to put in your cart.  Now it's time to show off these fantastic products!  I've only got one card today but I think you'll really like it.


I wanted to really show off the amazing new Quilted Flower Die Set with this card.  There are so many things you can do with this amazing set.  I used the stitching layer die to start building my background for this card.  This die also looks amazing when you use it to add stitching to the squiggly flower die or the flower base die.  SO many possibilities here.  Next I added to my background with the squiggly flower layer of the Die Set but out of a coral paper.  I brought back the Dual Dotted Rectangle Dies from last month's release to cut a piece of vellum for my sentiment.  I stamped this amazing sentiment from Greetings & Salutations and embossed it in white before adding it to my card front.  I anchored my sentiment with a watercolor bottom flower layer cut paired with the negative from the squiggly flower layer, again, all from the Quilted Flower Die Set.  All that was left was to add a little sparkle.  LOVE THESE DIES!!!

Here's what I used for you today:

http://www.lilinkerdesigns.com/quilted-flower-die-set/#_a_clarson

http://www.lilinkerdesigns.com/greetings-salutations-stamps/#_a_clarson

http://www.lilinkerdesigns.com/dual-dotted-rectangles-dies/#_a_clarson

I hope you enjoyed my creations and will join the rest of the team on the hop.  You'll want to leave comments along the way because Laura gives out a $15 Lil' Inker Designs store credit to a lucky commenter each day of the hop.  It could be you.


Chrissy Larson <---Yup, that's me!!!

Don't forget you can get the new release right now in the Lil' Inker Store!

Wednesday, July 22, 2015

Lil' Inker Designs July Release Day 2!


It's day two of the Lil' Inker Designs New Release Hop and I'm having the hardest time deciding what to share with you on what days because I think it's all SO amazing!  How's a girl to choose?  Lucky for you, you can get it all right now in the Lil' Inker Store.  You should have come here from the Lil' Inker Blog.  If you didn't, don't miss out on the amazingness there.  For now, I'm ready to show off some more fun stuff!

First up, I'm going to show off the Pineapple Panache Stamps and Pineapple Panache Dies.


Ok, these pineapples are way cool!  You could do tons of fun combos with pattern and color but the patterns are even fun as an element of their own.  I decided to use them for a fun black and white graphic punch on my card.  I started with a green stripe using the Stitched Mats: Long & Skinny Rectangles Dies and then added a sentiment from Pineapple Panache Stamps.  Then I took some of the fun pineapple bottoms from Pineapple Panache Stamps and stamped them in a line on the top and bottom of my stripe.  SO fun!  Next, I cut out a pineapple with Pineapple Panache Dies and stamped my pineapple topper with Pineapple Panache Stamps.  I embossed the topper with gold embossing powder which I reheated and layered 3 layers of gold embossing powder on.  I liked that it gave me a sort of dipped look in the end.  I finished off the pineapple with a faint pattern using watermark ink and then added my pink pineapple to my card.  A couple blingy dots, and you have a pretty fun birthday card.

Next up, I went a little more nuts with pineapples but added the Cover Up Die: Dotted Scallops and the Greetings & Salutations Stamps.


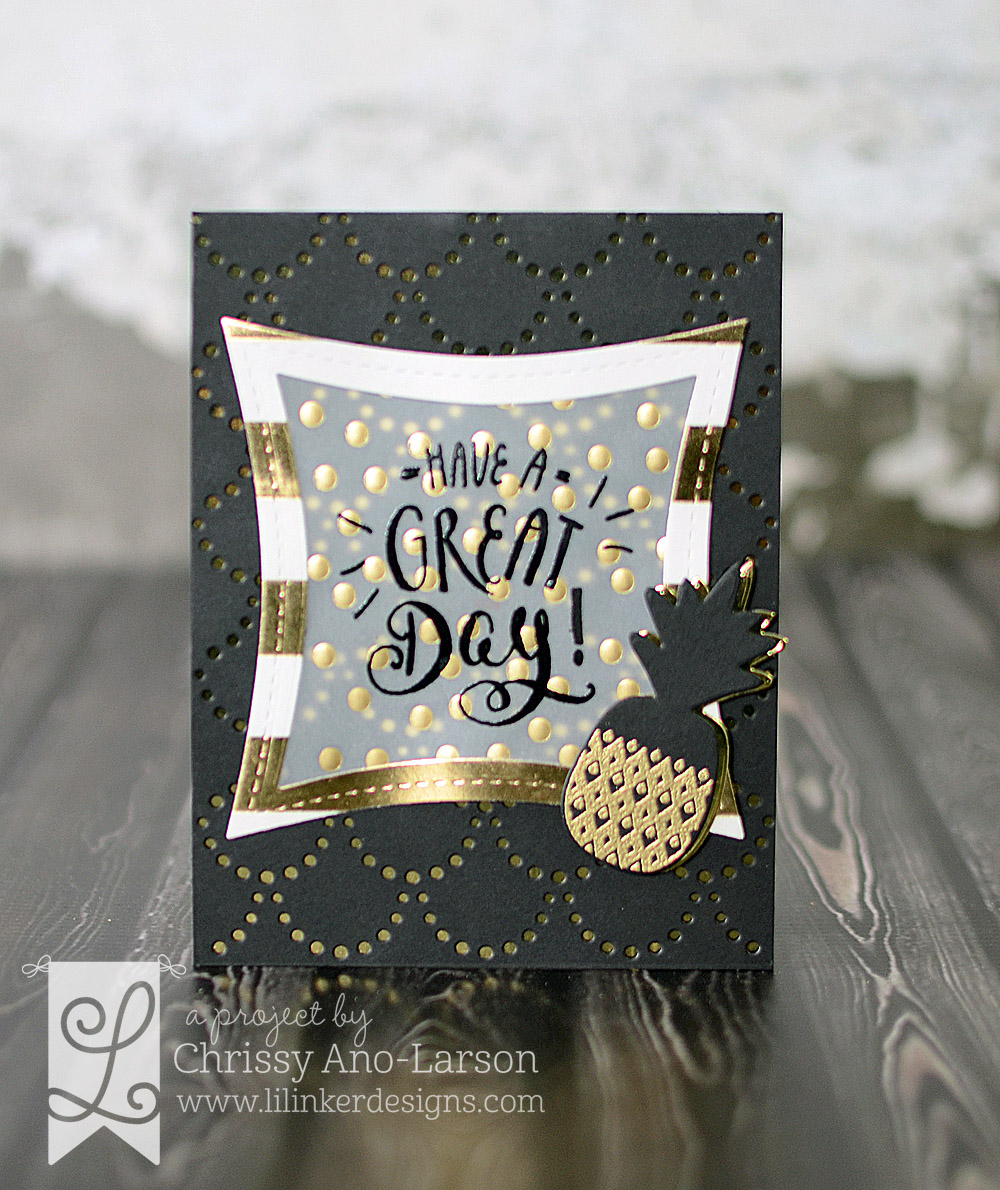
I just love this card!  So much shine and fun.  I started with a black card base cut with the Cover Up Die: Dotted Scallops.  I layered some gold foil paper behind to peek through those amazing holes!  Next, I stamped and embossed a super fun sentiment from Greetings & Salutations Stamps on some gold dotted vellum.  I cut a frame from some gold striped paper using the Wonky Squares Dies and framed my sentiment in the center of my card.  I cut a gold and a black pineapple using the Pineapple Panache Dies and after embossing a fun gold pattern on my black pineapple with the Pineapple Panache Stamps, I layered the two and added them to my card.  Love!

Here's what I used today:

http://www.lilinkerdesigns.com/pineapple-panache-stamps/#_a_clarson

http://www.lilinkerdesigns.com/pineapple-panache-die/#_a_clarson

http://www.lilinkerdesigns.com/cover-up-die-dotted-scallops/#_a_clarson

http://www.lilinkerdesigns.com/greetings-salutations-stamps/#_a_clarson

http://www.lilinkerdesigns.com/wonky-squares-dies/#_a_clarson
 

I hope you enjoyed my creations and will join the rest of the team on the hop.  You'll want to leave comments along the way because Laura gives out a $15 Lil' Inker Designs store credit to a lucky commenter each day of the hop.  It could be you.  I'm sure I'll see you on the hop and tomorrow for another fun day of release projects.  See you then!


Chrissy Larson <---Yup, that's me!!!
  
Don't forget you can get the new release right now in the Lil' Inker Store!

Tuesday, July 21, 2015

Lil' Inker Designs July Release Day 1!


Hi, you guys!  It's day one of the Lil' Inker Designs New Release Blog Hop and I'm super excited to share all the fun with you!  Today I'm going to share only a few of the awesome new release goodies but, lucky for you, they are available right now at the Lil' Inker Store!  We have a different blog order today so, hopefully, you are coming from Maureen's blog and if not, you won't want to miss her amazing creations or anyone's for that matter!  So make sure you didn't miss anyone and start at the Lil' Inker Blog.  Now for the fun!

First up, the most adorable stamp set you've ever seen, Snailed It, and the amazing Snailed It Dies to match. 


I totally adore this set and the sentiments are SO cute!  You are seriously going to love it.  For this card, I decided to go for a more graphic look with my snails so I started with some stripes that I added using the Stitched Mats: Long & Skinny Rectangles Dies.  I stamped my sentiment from Snailed It at the top of my lines and started stamping my cute little snails.  I decided to go with bright pink shells to make them pop against the black and white.  I cut my sweet snails with the Snailed It Dies and attached them on two of the rectangles.  It's hard to see in the picture but I made little snail trails using glossy accents along the top of the two rectangles where the snails are crawling.  Super fun!

I used the Snailed It Stamps and Snailed It Dies on this next card but I had to add in the Cover Up Die:  Stitched Woodgrain.  

   
This is my cutesy take with my sweet little snails.  I started by using the Cover Up Die:  Stitched Woodgrain on some woodgrain paper for my background.  To say I love this die is a total understatement.  I love woodgrain but stitched woodgrain, super cute!  Next I took some patterned paper and attached a bit of vellum to the top before stamping my sentiment and some flowers from Snailed It Stamps.  I stamped my snails in more muted colors for this card and cut them out with the Snailed It Dies.  I added them to the top of my patterned paper/vellum panel and then used glossy accents on their shells and along the vellum strip to create a trail.  Finally, I added three enamel hearts.  

Here are the products I used today:

http://www.lilinkerdesigns.com/snailed-it-dies/#_a_clarson

http://www.lilinkerdesigns.com/snailed-it-stamps/#_a_clarson

http://www.lilinkerdesigns.com/stitched-mats-long-skinny-rectangles/#_a_clarson

http://www.lilinkerdesigns.com/cover-up-die-stitched-woodgrain/#_a_clarson
 
I hope you enjoyed my creations and will join the rest of the team on the hop.  You'll want to leave comments along the way because Laura gives out a $15 Lil' Inker Designs store credit to a lucky commenter each day of the hop.  It could be you.  I'm sure I'll see you on the hop and tomorrow for another fun day of release projects.  See you then!


Chrissy Larson <---Yup, that's me!!! 

Don't forget you can get the new release right now in the Lil' Inker Store!

Wednesday, July 2, 2014

Even More Sweet: On Cherry Street Release!


It's here, it's here!!!  I must say that I have been waiting for this and I'm just bursting with excitement over the release of the very first On Cherry Street kit.  Want to know why I'm so excited?  Well, as you know, I'm pretty much a card maker at heart.  Sure, I dabble in pocket scrapping, traditional scrapping, and an occasional tag here and there but I'm a card maker deep down to my bones.  That is why this kit excites me SO much.  You're probably thinking I'm nuts about now as you look and see what to most people looks like a pocket scrapping kit...there are 3x4 and 4x6 cards in there for crying out loud!  Well, Nicole knows that I'm obsessed with using 3x4 and 4x6 cards in my card making...heck, I've sucked her into my vortex as well!  She also knows that most 4x6 and 3x4 cards can be tough to use on a card because the sentiment or picture is just not in the right spot for card making or it just doesn't fit with a stamped image you might want to use.  She's a smart gal and she knows that what card makers need is a kit designed for the card maker that wants a quick easy launching point for a card and THAT is why this kit is SO awesome.  Can it be used for scrapping, TOTALLY!!  Will tag makers love...well sure!  Card makers rejoice because, finally, there is a kit designed with you in mind.  Just wait until you see all the parts and pieces and the STAMP SET!!!  WOW!  Plus, remember those adorable stamp sets that I showed off yesterday?

http://www.sweetstampshop.com/new-release/

This kit works with those.  It's simply perfection and the price can't be beat ($15.95).  You must read more on the Sweet Blog about this awesome kit and then get your butt to the store and buy it.  You will be cranking out adorable cards, layouts, tags, etc in no time.  Wanna see?


Have I told you how much I love that little frog from Royal Wish?  Wait, I did...yesterday!  Ha ha!  Well, pair him with the Polaroid frame, stripey card, wood embellishments, and an adorable sentiment from the kit's stamp set and you have a card that pretty much made its self. 

http://www.sweetstampshop.com/magical-kit/

I added a few of my own supplies but the frame and card started it all for me.  The rest just fell into place.  That is why I LOVE working with 3x4 and 4x6 cards.  They really make card making a breeze and they give you a great focal point to start from.  AWESOME!  Remember that I said tag makers would like this too?  Check this out:


Now, I do not consider myself a tag maker in the slightest.  I can sort of create a tag to put on a card but I've never been completely satisfied with them.  Give me a cute 3x4 card though and I can make a tag!  I almost passed out from the shock of actually creating a tag that I liked...no, LOVED!  This 3x4 card from the kit was just too cute to not make an awesome tag.  All I did, was add some glitter paper and patterned vellum to each side and stick it on an already made tag.  I added some bling because why wouldn't you?  Then I decided I wanted a little more than just a bow or tie at the top.  So, I stamped some of the jewels from Royal Wish, colored them, and added them on different lenghts of colored bakers twine.  It finished it off perfectly!  OMG, I made a tag!!!  It looks pretty awesome on my fun chevron gift bag too.

No matter if you are a card maker, scrapbooker, tag maker, or anything in between this is the perfect kit for you but you don't have to take my word for it.  Go check out the Sweet Blog to see all the amazing creations that can come from one kit.  You'll get to see a peek at some projects that I'm going to show you this month in more detail.  Also, you will want to join our Facebook page and keep checking the blog to get even more inspiration using Sweet Stamps and the On Cherry Street kit.  It's all really too good to miss!   

Tuesday, July 1, 2014

It's Time For A SWEET July Release!


Are you ready for a wonderful day over at the Sweet Stamp Shop?  I must admit that I have been looking forward to this release for a while now and I totally wasn't expecting to love it as much as I do.  I have three boys so fairytale/princess sets don't usually work for me.  Only 3 of my 9 nieces and nephews are girls and they are all older and not really in the princess zone.  With all of this stacked against Nicole's release this month, she sent me the three sets I thought I would have the least opportunity to love and you know what?  She won me over BIG TIME!  Yup, I'm admitting it here, Nicole made me love this line of stamps and the crazy thing...they are probably some of my favs now.

Today's release is a little different than normal.  Nicole is releasing a bundle today with all 4 stamp sets and the new On Cherry Street kit (which will officially release tomorrow) for only $45 and free shipping if you use the FREESHIP code.  So, for $45 you get 4 adorable stamp sets and an AWESOME kit that includes yet another adorable stamp set, 3x4 and 4x6 cards, and embellishments.  Talk about a deal!  It's today only so get it while the gettin' is good.  ;)  Tomorrow, you will be able to buy things individually but if you want it all (you do), today's the day!  Check out the Sweet Blog for more info.

So, do you want to see how Nicole talked me right into loving these sets?  Here we go.  

First up, Royal Wish:

http://www.sweetstampshop.com/royal-wish/

I immediately fell in love with that frog!  Out came my scrapbooking cards and I created this:


Seriously, this little guy is cute in black and white and colored.  I just love him!  You know what I love the most?  He works for boys but still keeps the magical feel of these sets.  LOVE LOVE LOVE!  The sentiment...magical!  I had some vellum that matched my colors perfectly so I diecut them and layered them for a little extra fun.  Ready for another?


For this card, I stamped the stars from Enjoy Calligraphy and embossed them with white before layering on some watercolor.  I then stamped and embossed my castle in silver.  I was having a tough time with how to get my sentiment on this card but some vellum clouds were the perfect answer!  This card went right into the mail to my niece who is trying to decide what path to take in her job/college life.  I thought it was perfect for that!

Next up, Enjoy Calligraphy.

http://www.sweetstampshop.com/enjoy-calligraphy/

This set is one of my all time favs!  The sentiments are awesome...wow!  I was inspired right away!


I knew the sentiments needed to take center stage and this stripey scrapbooking card seemed like the perfect way to show it off.  I stamped some stars from Royal Wish with some gold all over the card for a little extra pattern and offset a piece of gold paper to give it a fun edge.  I stamped my sentiment on another paper to cut out the banner and make it pop on the card.  It all came together perfectly and the sentiment really is the star!

My next card combines Enjoy Calligraphy with Koalas (one of my favs from June):


I just loved this sentiment and thought it would go wonderfully with a set that I could have a "big" and "little" animal.  I stamped the sentiment on a piece of vellum that I shaped into a banner and layered on some patterned paper that I also cut into a banner.  This really helped the sentiment stand out on the vellum.  I layered those on one of my favorite scrapbook cards ever.  I loved the colors in the card and took those to my card base and Koala coloring.  It all came together nicely.

My final set to show off, Princess, is just adorable and versatile.

http://www.sweetstampshop.com/princess/

Want to make some of the sweet animals royal?  With this set, you can!  Just look:


A little masking and I had the perfect princess for my card!  How perfect is that scrapbooking card for a princess card?  "Oh the drama!"  I have a friend's little girl in mind for this one!  ;)


I've got to say, this is probably my favorite card of the whole bunch!  The hat and wand from Royal Wish are too fun and make a card great all on their own.  Don't you think?

I hope you enjoyed my cards for the release.  I had a blast with it The stamps are amazing and if you order the bundle today, you'll be getting an amazing kit too!  I can't wait until you get to see the whole On Cherry Street Kit that Nicole has created!  Guess what?  I get to show that to you also.


So, check back tomorrow for what I did with that amazing kit and while you are at it...order the bundle today and get EVERYTHING!  You won't regret it.  ;)