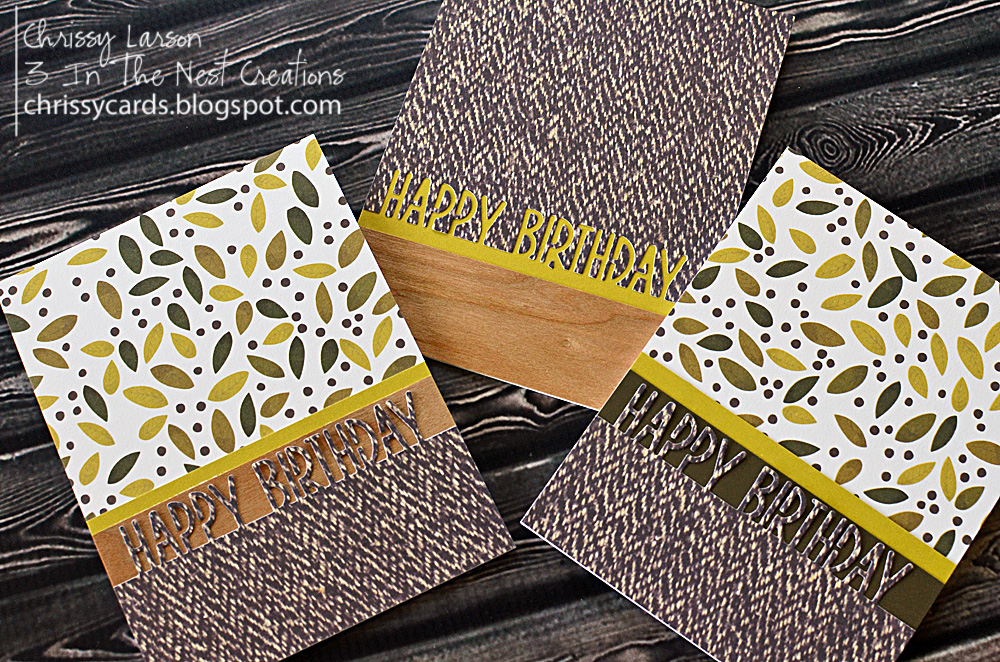
Good morning, you guys! We are heading down to Des Moines this morning to see how my son's shoulder is healing up. Here's hoping the cyst is filling in on its own and we won't have to mess with bone grafts. I hope you are all having fun and less eventful days. I do have something exciting to get your going today! There's a new sketch up at CAS(E) this Sketch! It's a SUPER CAS sketch this week and I'm super excited to see what everyone does with it. The design team blew me away this week (as always!). I hope you'll enjoy my take.
Talk about a simple take on the sketch. The most complicated part of my card was lining up the Happy Birthday Border Die so they matched even when upside down. The card base is a one that I found in a box of patterned cards and I just loved it. I wanted a pop of color for the sentiment so I went with a bright yellow. I used the Happy Birthday Border Die to cut my sentiment but then decided I wanted to try a little something different with it so rather than cutting the bottom line to the thickness I wanted on my cutter, I used the die to create a mirrored image. Super fun and simple. Here's a closer look:
Thanks so much for checking out my card and I hope you'll join us this week at CAS(E) this Sketch!
Showing posts with label Happy Birthday Border. Show all posts
Thursday, March 8, 2018
Thursday, November 23, 2017
Black Friday Sale At Lil' Inker Designs
Happy Black Friday everyone!! I hope you get all the amazing deals you are after today or if you are just relaxing at home, like I am, I hope it's the most relaxing day ever. I wanted to make sure to hop on here today to share some info about the Black Friday sale on the Lil' Inker Store. I have a couple of cards to share with you today in honor of this awesome sale and I hope you enjoy them!
My first card uses the new Unstoppable Stamps. I created a fun rainbow background and when it was done, it reminded me of an animal print so I decided to use one of my favorite party animals, an elephant from Party Pachyderms. I used the Party Pachyderms Die Set to cut him out and fussy cut a balloon to go in his trunk. I created a border with the Happy Birthday Border Die and added some patterned paper to break up the black. Here's a closer look:
I also created a card using some more of my favorite older products that will be on sale! I just love how elegant this card turned out.
I started with this awesome cardstock color and the amazing Stitched Quatrefoil Die. I love LOVE the pattern this leaves behind! Next, I colored an adorable birthday banner from Blossoms Banners Stamps and cut it with the Blossoms Banners Dies. I was going to simply layer it on the card but them I decided to go with some gray stripes first and I love the finished look. Here's a closer one:
Thanks so much for checking out my cards today and I hope you'll stop over at the Lil' Inker Store and take advantage of the awesome Black Friday Sale going on now. There are tons of products for 50% off and 25% off the rest! Can't beat that! While you are there, sign up for the newsletter! You won't want to miss out on the extra special deals you'll find in there. Just to show you how awesome the newsletter deals are, I'm going to share with you the one from the most recent. Aren't you lucky??
Aren't you glad you won't be missing out on this one? So, get over to the Lil' Inker Store and check out the sale. I'd really appreciate it if you used a link to the store of products from my blog as I get a little bonus for sending you all that way. Don't worry, it won't do anything more than help me out! I appreciate it! Here's what I used for my cards today:
Saturday, October 7, 2017
Happy World Card Making Day
It's World Card Making Day and we are celebrating over at the Lil' Inker Store. Laura is offering 20% off (No Code Needed) all in stock items excluding the new September release items. The deal goes today and tomorrow so I hope you'll go check it out. There are tons of fun products to add to your collection and I decided to share a card I created with one of my favorites. Also, make sure to check out all the new changes to the store. I'll talk more about them at the end of this post. Here's my card for today:
My card today features the Happy Birthday Border Die cut in gold and layered with black cardstock and gold washi tape. It is layered over a background I created with some striped paper and black cardstock. It couldn't be any easier to create this modern looking birthday card and the Happy Birthday Border Die is so versatile for all sorts of different styles. You can look here to see all the different ways I've used it! Here's a closer look at my card:
Make sure you check out the Lil' Inker Store! Laura has made some awesome changes including accepting Amazon Pay and Apple Pay as checkout options. My favorite new addition is the new Live Chat option! How awesome is it to be able to ask questions about products when you have them. You can't beat that for customer service! Go ahead and give it a try this weekend because I've heard that Laura just might be doing some giveaways using this new and awesome feature!
I hope you guys are all having a great World Card Making Day and I can't wait to get out and see what you all are creating! Have a great day!
Thursday, July 13, 2017
CTS #230
It's another fun sketch over at CAS(E) this Sketch this week and it was the perfect excuse for me to use some of my favorite products! I hope you'll enjoy my card this week. We are gearing up for a fun weekend of Drum Corp International shows and some water park fun. Being former members of the USAFA Drum & Bugle Corps, Brent and I can't resist a good field show and we can't wait to take the boys to see the Colts perform tomorrow evening. I can already feel the drums!
Our sketch this week is super fun and I broke out the Lil' Inker Designs Color Blocking Die for my take.
I picked out some fun patterned papers and cut them with the Color Blocking Die and used them to make three fun card bases with cool color blocked designs. I swear I love this die for that! I picked my favorite combo and then added a strip of red card stock cut using Stitched Mats: Long & Skinny Rectangle. Next, I layered a cool flower from the same paper collection before layering on my sentiment, Happy Birthday Border Die. Here's a closer look:
Thanks so much for stopping by! I hope you'll join us this week at CAS(E) this Sketch.
Monday, March 13, 2017
Color Blocking Birthday
Good morning, everyone! We have snow on the ground again and both the chickens and I are protesting! I was all ready gearing up for Spring and snow was the last thing on my mind. When I heard it in the forecast, I just kept hoping I was hearing things. No such luck. ;) Hears hoping it melts quickly. In hopes of warming things up, I decided to share this card I created while on a Color Blocking Die binge. I'll be sharing the other cards I created with the die throughout the week. I'm telling you, I'm blaming my love of this die on Jen Carter and her awesome video. You must check them out! Here's what I created pairing the Color Blocking Die with the Happy Birthday Border Die.
I started with an awesome paper pack from Echo Park called Just Be You. I chose three papers that I liked and layered them before passing them through my die cut machine to be cut with the Color Blocking Die. This one cut created three card fronts with different combos of the papers. Talk about easy! Next I cut the Happy Birthday Border Die from some coordinating cardstock which I attached to the card front with some glitter tape. It looked super cute just like that but I had some fun wooden arrows and stars to add to up the cute factor. I hope you like my creation. Here's a closer look:
Have a great Monday and I hope you get some crafty time in! I'm hoping to get working on some more fun cards today. I hope you are too! Here's what I used for today's card:
Tuesday, October 11, 2016
October Is For Birthdays!
Happy Tuesday! It's another gorgeous October day here (well, it will be when the sun comes up) and I made a few cards I wanted to share with you guys. It seems like most families have a month or two jam packed with birthdays. Almost like everyone in the family was born in that month for some reason. That month for me is October. I've got birthdays here and birthdays there. I go through a ton of birthdays cards in October. So, I decided to see what I could do to make some quick and easy birthday cards for easy mailing. Here's what I came up with:
I used the American Crafts 12x12 Warm and Cozy paper pack as my starting off point and then just scraps around my desk area. I knew I needed to use up some scraps and the easiest way to make birthday cards and make great use of the full paper, is to use the Lil' Inker Designs Happy Birthday Border Die. So, I went to work combining papers and using both the positive and negative of the die. I layered and combined and these are just three of the different looks I came up with.
I think they'll be perfect for male or female and super easy to mail because they are nice and flat. I hope you enjoy them and play with some of the scraps and bits you have laying around! You can make some really fun creations.
Here's what I used today:
Thursday, August 18, 2016
CTS #186
How are you guys today? I hope you are having a great week! We are getting ready to get back into the school routine next week and I can't believe the summer went so fast! The crazy thing is, this year my oldest is going to school school and I'm excited and nervous all at the same time. I know he is making the right decision and I'm very happy with his choice of school but I really like having all my boys home with me. I'm going to miss him. ;) Of course, I'm also super excited for him to be part of band and choir. I look forward to watching him perform and cheering on his accomplishments. I'm also excited for him to find his niche and to see how he'll find his own path. So much fun to come. I'm still not sure I support this whole growing up thing though. Ha ha!
Speaking of fun to come, did you see the latest CAS(E) this Sketch challenge? It's jam packed with fun! I hope you'll join us this week and share what you create with the sketch. Here's my card:
My card today is super simple. I found some fun patterned paper and used the Lil' Inker Designs Happy Birthday Border Die on some polka-dot paper and placed it at an angle on my card. I then added a strip of pink and white paper with a zigzag underneath for a pop of color. I finished it off with a flower stamped on vellum using Warm Welcome Stamps and cut with the Warm Welcome Dies.
I hope you enjoyed my card today and I'll see you over on the CAS(E) this Sketch blog! Now, back to sharpening pencils. Ha ha! Here's what I used today:
Saturday, August 13, 2016
Laura's Birthday & Lil' Inker Designs Anniversary Bloghop!
Hello everyone and happy birthday, Laura and Lil' Inker Designs!!!! If you are just stumbling on my blog then maybe you haven't heard but the Lil' Inker Designs design team decided to surprise our fearless leader, Laura, with a little birthday bloghop to thank her for everything she does for us. We are super excited to share with you all some our favorite Lil' Inker Designs creations and we hope you'll enjoy the hop as much as we enjoyed sneaking around to plan it.
First up, I want to make sure you know about the awesome sale Laura is offering to you guys TODAY ONLY! Check it out:
Make sure to check out the Lil' Inker Blog to read all the details! Now it's time for me to share some of my favorite cards from my time with Lil' Inker Designs. It was not easy to choose but I went ahead and stuck to birthday cards! :)
I did some mass die cutting to make this card using the Awesome Blossoms Dies. Then I stamped them with Awesome Blossoms Stamps in various shades of ink. I love how you can layer the stamps or not layer them and they still look just as awesome! I added my flowers to a Stitched Mats: Dual Stitched Square that I had cut and stamped with a sentiment from Awesome Blossoms Stamps. I chose this black pattern paper and mounted my focal point at an angle to match the angle of the words. Finally, I trimmed off the overhang to finish the card. Still one of my favorite cards!
This card from the most recent release will always be a favorite! I actually started this card playing around with all the different combos of dies and stamp options available using Doodled Daisies Stamps and Doodled Daisies Dies. These are really fun to play with and I enjoyed mixing and matching solid stamps with the image stamps. When my desk was full of flowers, I realized I better figure out what I wanted to do with them all. I found this green pattern paper that reminded me of the doodled quality of my stamped images so I went with that for a card base. Next, I new I was dying to use the Happy Birthday Border Die so I cut it from black to make it really stand out against the green. I added it to my card front using some foam tape so I had plenty of room to arrange flowers in front and behind the cut. I laid all my flowers out so I could get the alignment of the swirly sprig just right before stamping it in black on my patterned paper. Next, I fastened all my blooms to my card. All done! One more:
This final card just made me think of Laura! She could totally pass for 29! :) I couldn't wait to use these Dotted Tag Dies! They are SO cute. So, I cut a tag out of a fun navy patterned paper and added a star from the Stitched Stars Die Set. I stamped my sentiment from Keep It Sassy Stamps around my star and the Awesome Word Die that I added to build my full sentiment. I added a ribbon and then put my tag on this card front cut using the Dual Dotted Rectangles Dies. I added another cute stamp from Keep It Sassy to finish off my sentiment just below the tag before adding a little bling to the card as a finishing touch.
I hope you enjoyed my creations and will join the rest of the team on the hop. Don't forget to check out the sale in the Lil' Inker Store.
Amy Kolling
Chrissy Larson <---Yup, that's me!!!
Have fun on the hop and happy birthday, Laura!!!! Here are the products I used for these creations:
Subscribe to:
Posts (Atom)